How to install the stainless steel water ripple ceiling tiles
 Apr 24,2023

 Vaacoo
How to install the stainless steel water ripple ceiling tiles
Installation preparations:
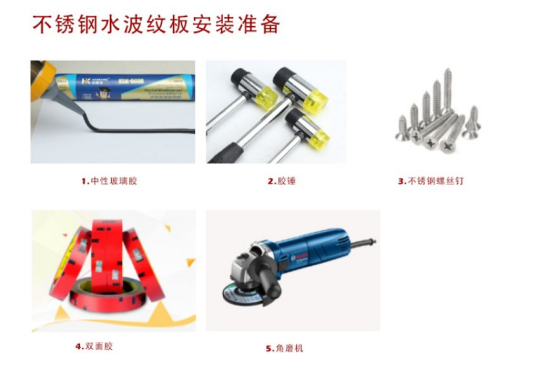
1. Glass glue (structural glue)
The dosage per square is about 590ML.
2. Rubber hammer;
Some parts of the stainless steel water corrugated plate are not very smooth, and need to use a rubber hammer to correct. Stainless steel water corrugated plate is generally thin, modeling is also more random, so the correction will not affect the overall effect. If you don't have a glue hammer, wrap it in a plastic bag or discarded cloth.
3. Double-sided tape.
The wider the better, the recommended use of 3mm double-sided tape. Double-sided adhesive can play a temporary fixed role, long-term fixed or need to rely on structural adhesive.
4. Screws.
If you install on the ceiling, screw and stainless steel plate water corrugated plate the same color, can not be taken down. If the color is different, it can be taken off until the structural glue dries.
5. Angle grinder.
Used for cutting water corrugated plate. It is recommended to use stainless steel special slice. Some slices may cause serious discoloration of stainless steel edges.
Stainless steel water corrugated plate is generally used in wall decoration or ceiling decoration two kinds of scenes. There are generally three things we might do during the actual installation process.
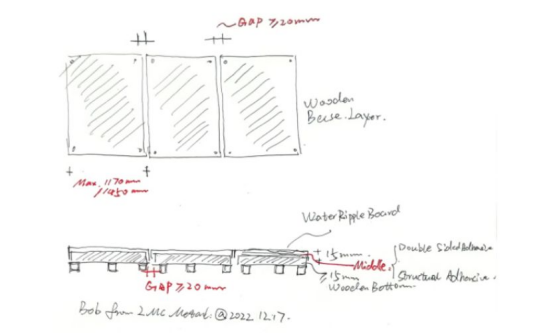
a. Use plywood as the base, buckle the edge installation.
i. Base thickness requirements:
The use of plywood as the base level is recommended to do more than 10mm. 12 or 15mm is best. The reason for this is the uneven surface of the stainless steel water corrugated plate.
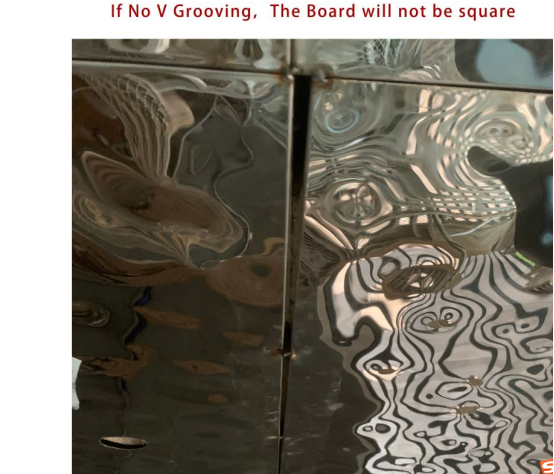
When using a bending machine for bending, edges smaller than 10mm May not fold up. Even if it is folded up, it will probably not be a right Angle, and some places will deviate with the shape of the ripples, and it is difficult to correct. This will create a large gap between the plates.
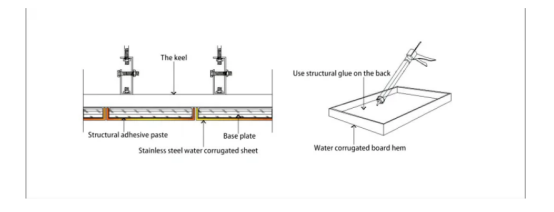
ii. Procedures need to be adjusted:
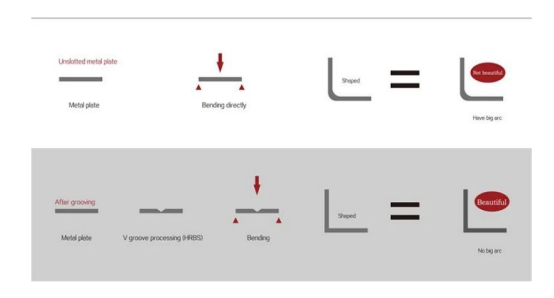
The specific steps are: the first step is to open the material planing groove, the second step is to press the water corrugated plate, the third step is to bend the buckle edge.
If you directly take the plate press water corrugated plate, and then bend. In this way, it is difficult to ensure the size accuracy, and it is easy to cause relatively large size deviation. The reason is because of the uneven stainless steel water corrugated plate.
A common consequence is that the board may have large or small heads, or have incorrect diagonals. In the large area combination collage, it is difficult to form a straight line with several workpiece combinations, and the cumulative error of stitching will be relatively large.
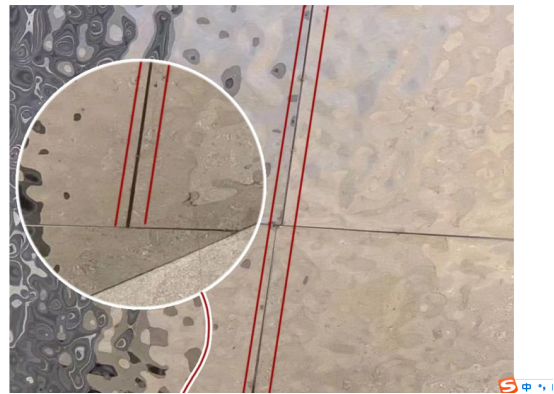
If we cut the planing groove first, then press the water ripple. Then the bending operation is performed. When bending, bending master directly according to the planer line bending, can maximize the accuracy of the board diagonal, avoid the size of the head problem. In batch installation can minimize the installation error.
The disadvantage of this is that the cost is slightly higher than that of direct bending.
iii. Specific installation steps:
Step P1: Measuring the site to do the base.
Make wood base on site. If it is outdoor need to pay attention to waterproof requirements, pay attention to the selection of waterproof plate. Note that a gap of 20mm should be left between the plates.
Single base width needs to consider the width that can be achieved by the water corrugated sheet. If 1220mm water corrugated plate is purchased, the maximum width of the plate is recommended to be 1170mm after deducting the factor of 20mm hem. If the purchase is 1500mm plate, the widest can be 1450mm.
[FIG. 4] Schematic diagram of maximum size
STEP2: Order water corrugated plate according to the base
Order water corrugated sheet from factory based on measured wood base. If there is a hole, the location and size of the hole should be marked on the measuring drawing. If accuracy is not required, Angle grinder can also be used on site.
STEP3: Glue
Wait until the water corrugated plate ordered back, on the back of the water corrugated affixed double-sided adhesive, and play structural glue (glass glue). Pay attention to the base to ensure dust-free and dry, so as to maximize the guarantee of bonding effect.
STEP4: Fixed installation, auxiliary support
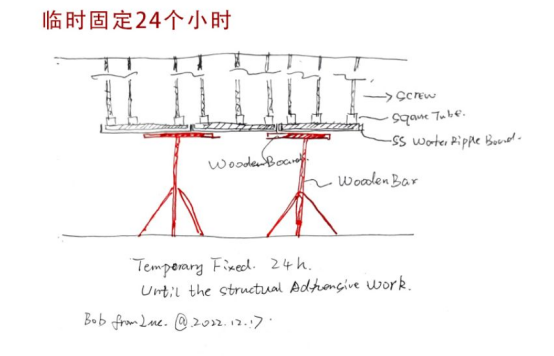
When the stainless steel water corrugated plate and the base after bonding, it is recommended to do auxiliary support. It is generally supported by wooden boards and wooden poles. Wait until 24 hours later, that is, the structural adhesive can play a very good bonding effect, you can remove the base.
STEP5: Remove the support and tear the protective film.
After 24 hours of installation, the auxiliary support can be removed and the protective film torn.
b. Use splints as the base and install them flat.
Sometimes our customers will directly purchase stainless steel water corrugated plate, on-site cutting or use the shearing machine to cut flat paste use. Some experience of flat paste installation of water ripple plate is introduced here:
i. Experience and considerations:
1. Avoid deep-water styles when buying. The water pattern can be made to order. There are deep water ripples. If you buy deep water waves, you may encounter serious splicing problems when splicing. The deepest and shallowest drops can reach 50mm.
2. It is recommended to wrap the edge of deep-water corrugated plate separately. Or you can design a clear space.
3. Use two types of glue when installing. One is double-sided adhesive, the other is structural adhesive. It is recommended that you purchase 3M double-sided tape with a width greater than 20mm. Foam double-sided adhesive can also be used on walls. The function of double-sided tape is to play a temporary fixed role. It takes some time to fix the structural adhesive, which generally takes 24 hours to be completely stable. Please refer to the instructions for details.


 HOME
HOME What effect can the surface of stainless steel present?
  You May Also Like










 Tel
Tel
 Email
Email
 Address


 Let’s Talk
